 – Sunset of Repentance Quest")
Despite its significantly smaller player count compared to its initial months, Throne & Libertyhas just released the Wilds of Talandre free expansion that has brought its remaining fans some much needed new content. In this guide, we will be going over the Sunset of Repentance quest, which involves a puzzle that has seemingly been getting people stuck for unreasonable amounts of time.
Secret Device of the Belfry Quest Guide (Animal Statue Puzzle) – Sunset of Repentance Quest
At the start of the puzzle, what you are tasked with is to give the correct weapon to the knight statue inside the Management Room. So, the game does tell you exactly what you need to do, but it is more of a hint rather than the actual exact step that you must follow.
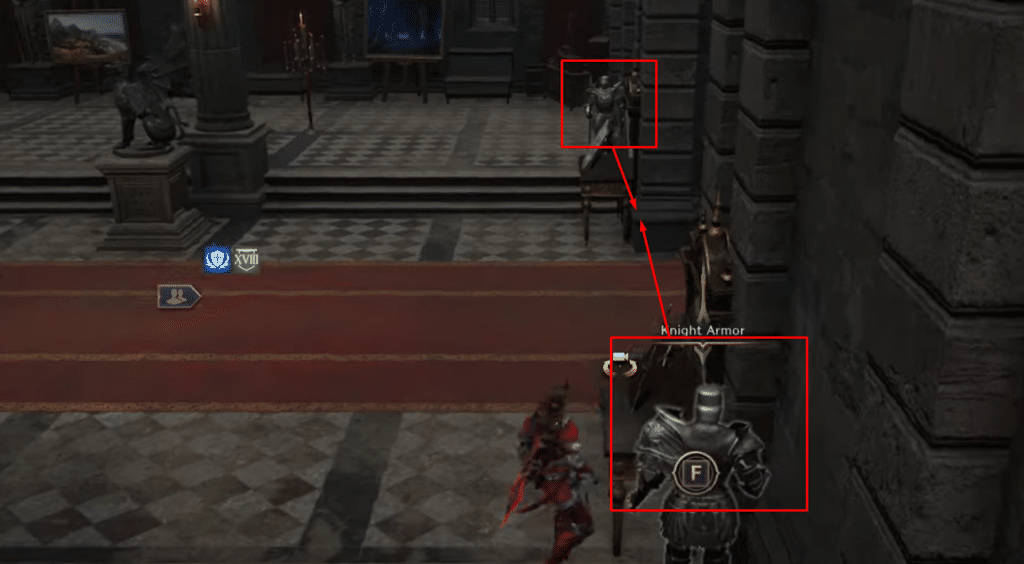
First, you have two different suits of knight armor outside the room, which have either a sword or a spear. Interact with the one that is holding a sword to pick it up, and take note of the shield display rack that is right beside it.
Give this sword to the knight statue at the Management Room, which should be marked with a quest marker. After that, pick up the shield from the rack that was right beside the statue holding the sword, just by the door of the Management Room. Give this to the statue inside as well.
Once you have done these prior steps, you now have to get the leaf decoration from the Manager’s secret vault. This “vault” is just the chest a few steps away from the statue, which should be the only thing highlighted with a quest marker at the moment.
Upon picking it up, follow the quest marker outside of the Management Room and then open the storage door that is marked on the other side of the main room. This will give you a hint based on the painting stuck to the door.
If you did not just skip past all the text, you will see that the next step is actually incredibly obvious. The painting shows two knights facing each other, with this clue nudging you towards the right direction: “Could this be related to the two knight statues nearby?”
Obviously, all you need to do for this step is to interact with both knight statues. Just keep rotating them until they are facing each other. When you are done, the door to the storage room should automatically swing open.
Solving The Hallway Animal Statue Puzzle
Your next objective will be to go in the storage room and interact with the painting that has constellations on it. Your hint here is that there is a constellation for each animal depicted in the painting, and all of these creatures are facing in different directions.
Just like with the statues outside, the game nudges you into the right direction by explicitly stating that it is related to the animal statues in the hallway outside. So, head over there to start the animal statue puzzle part.
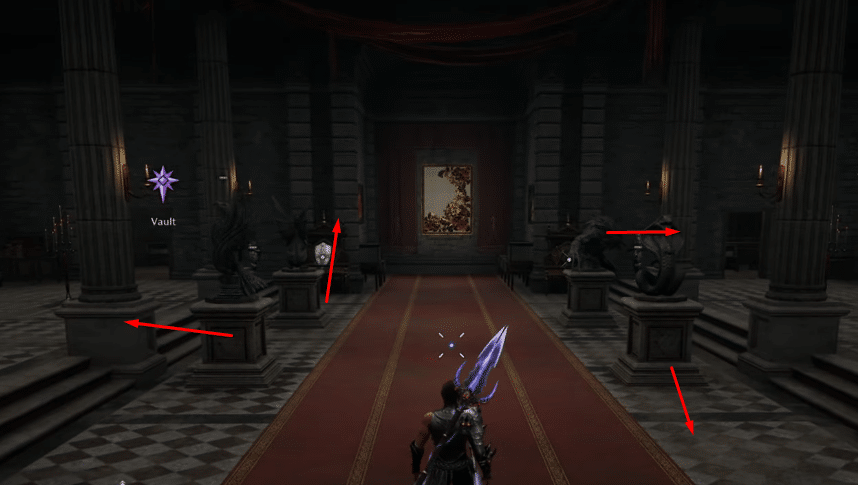
For this, the statues must be facing in the following directions:
- Bird Statue – Have it face the pillar right beside it, which should have it pointing to the north.
- Griffin Statue – This should be facing east, where it is looking at the shield display rack a few steps away from it.
- Snake Statue – Just flip this so that it points to the west, which is towards the entrance and the knight statues that you rotated earlier in the quest.
- Werewolf Statue – Finally, this one should be rotated to point towards the pillar beside it, just like what you did with the Bird Statue at the start of the puzzle.
If you still need help, refer to the image below to see the final orientation of the entire animal statue puzzle section of this quest, which should automatically start the next part as well:
The Flower Shaped Decoration and Solving the Flower Puzzle
Next, your penultimate objective for this is to get the flower shaped decoration at the “secret vault” of the storage room. Looking past the strange translation, the “vault” is merely another chest that is marked in the storage room. Take the decoration in it to get the final objective.
Once you have the flower shaped decoration on hand, you will have to investigate the empty rose picture in the main room, which should be highlighted with a quest marker as well.
As soon as you investigate the painting, the rose decoration puzzle should now begin. You must open the petals in the correct order in order to proceed. This part is pretty simple, you just need to unravel the rose hidden in the device.
Click on the top petal that is right in your face at the start, and then flip the puzzle around. Click on the petal at the back and the petals should now each be in their own separate spots. All you need to do from this point on is to spin the gear at the back and then click on the rose at the front.
Refer to the image below to see what the final product should look like. It is hardly a puzzle, since all you do is form a regular flower shape.
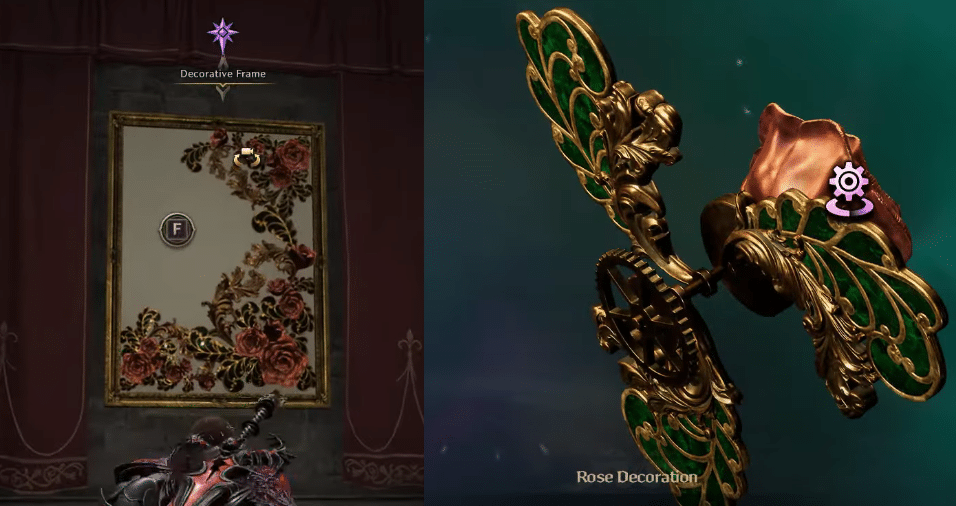
Finally, all you need to do from this point on is to hold the interact button on the empty space of the flower painting to insert the rose decoration on it. This should let you proceed with the next part of the quest, which will require you to speak with Iska, who will start running towards you.
Congratulations, you have now completed this deceptively easy and quick set of puzzles. There does not seem to be any randomness to this, so each player should theoretically have the exact same steps to follow. With all of this information on hand, you should be able to breeze through in just around a minute!